Frequently Asked Questions
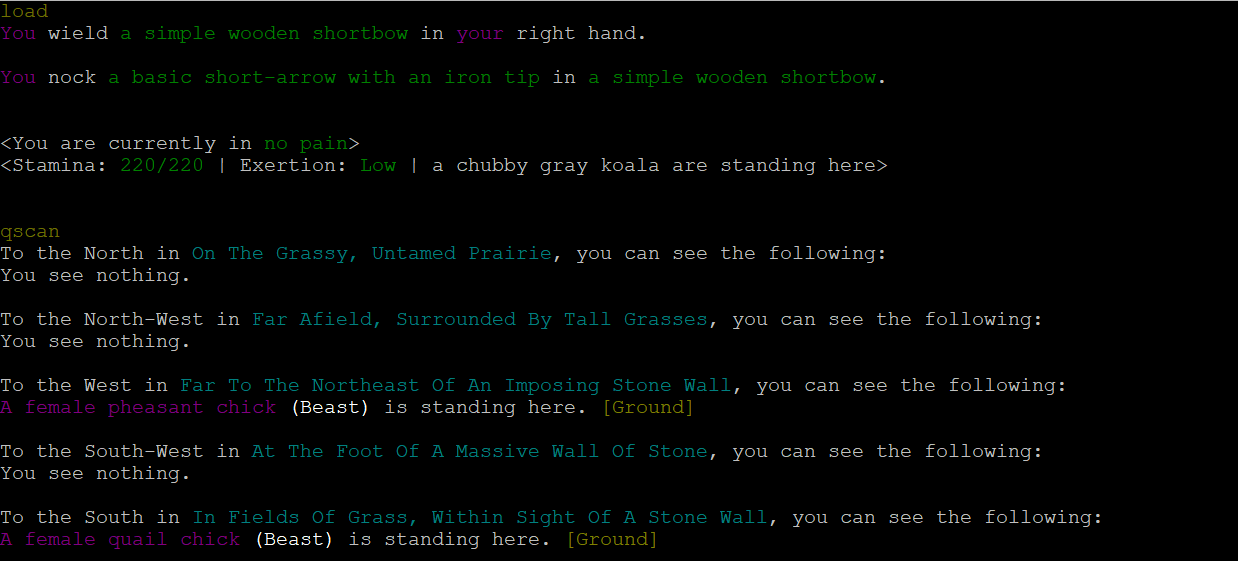
There are a few steps to firing your bow. First, you must have your bow in one of your hands and either a quiver with arrows in it. The arrows must match the bow type. Once you have met those two conditions you can use the load command. This command will wield your bow and load it with an arrow of the appropriate type. An important note at this point is that you should have your target in sight before using the ready command. When you use the ready command you will begin to drain stamina. You can use the targets command to see which targets are in your line of sight.
Once you have loaded your bow and have established a target, you can use the ready command that will then allow you to use the aim command. You will begin aiming at your target and when you feel you are ready, you can use the fire command. For an example of how to properly use the syntax, an example is listed below.

The first thing you need to know about running a shop is the shop command. With this command you will be able to see every subcommand that is available to you for your shop. If you are the manager of the shop then you will need to know how most of these commands work. Good news is, there is a tooltip for how each of the commands work. The hierarchy in level of employment is manager, proprietor, and then employee. As a manager and proprietor you can hire and fire employees.
Once you have established how to hire, fire, and promote employees you will want to stock your shop with items for sale. To begin stocking items, you first have
to set up an item profile for your shop. You will be able to determine what the item costs, if it should be reordered, if you will buy the item from others, and more!
The command you will want to start with is shop merch. Using this command, you will be able to see all of the subcommands available
to you for the merchandise sold in the shop. The next thing you will want to do is use the shop merch new command to set up an item.
Once you have set up an item, you will never have to set it up again. You will be able to modify the price and name of the item at any point in the future. While
setting up the merchandise, you will have to enter a few parameters. The full command would look like this shop merch new (item description)
(id)|(target) (price)
Here are a couple of examples of how you might write the command to add items to your shop:
shop merch new "Medium Mixing Bowl" bowl 15b
shop merch new "Raw Bear Haunch" haunch 50b
shop merch new "Iron Shortsword" shortsword 250b
After you use the shop merch new command, you can then begin stocking your items. To do this, you will need to use the shop stock
command. In order to use the shop stock command you simply need to tell it which item to stock. So an example of this, based on the
previously created merchandise would be:
shop stock bowl
shop stock haunch
shop stock shortsword
Another method for stocking your shop can be to use the shop autostock command. This command will automatically stock any items that are able to be stocked in your shop. The items can be in your hand or on the floor in your stockroom and it will check against your shop merchandise list.
Once you have stocked your item to show up in your shop, you simply have to drop the item in the shop's storeroom. Any items located in the shop's stock and placed in the storeroom will not decay.
When stocking items that have a variable all of the items will be stocked in the same shop merchandise profile. You will have to give the merchandise a base cost and then apply a multiplier for that based on which variant that can be chosen. Currently, there is no syntax for how to set the variable, but it is in development by the FutureMud Developers. When you add a new piece of shop merchandise your shop list will look like this:
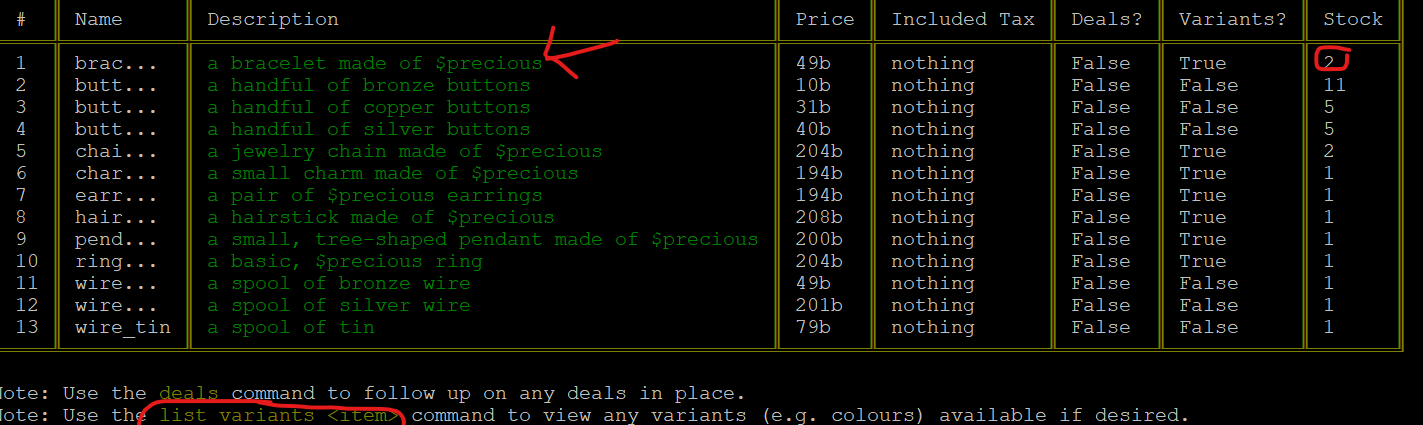
Then, when wanting to see which variants are available you can use the list variants (item) command.

Hit
If you wish to attack someone, you can HIT (Target) to initiate combat.
‘Charge’
If you are at range however, you can use the “CHARGE" command to charge yourself into melee with your opponent.
‘Cover’
If you are being attacked at a range you may also use the ‘COVER’ command to look for any suitable cover in the area. Not all terrain types have cover however some items within rooms can be used for cover. A common cover item is a flipped table, which you can use for cover if you use the ‘FLIP’ command before using ‘COVER’. Each type of cover has a set number of people it can provide cover for so it can be a limited item depending on the room.
Target
While in melee combat you may also use the ‘TARGET’ command to target a specific location on your opponent, a common use for this would be to ‘target face’ so that you start performing attacks that are more likely to hit the opponent in the face. This can also be used
Flee
If you decide you’ve had enough you can use the ‘FLEE’ command to attempt to escape combat, this will be contested by your opponent. Should you escape the melee into a skirmish range, you can then move into a direction. Your speed will automatically be set to sprint.
Surrender
While in a fight, you can also use the ‘SURRENDER’ command to submit to your attacker. Not all opponents will accept, however it is useful if you find yourself on the wrong end of the law. If your surrender is accepted. You will be able to ‘STRUGGLE’ to attempt to break free
Health
The ‘HEALTH’ command will give you details about your character's health, this will allow you to keep track of your health and how many wounds you have and where your pain is. Remember that your characters have organs and if they’re damaged there is likely to be pain in those locations
’Bind’
If you have a bleeding wound you can use the Bind command in an attempt to stem the bleeding
Second Wind
When your character runs out of stamina, they will incur a ‘second wind’ which will return their stamina to full. The cooldown for a second wind is quite long so it is likely to only occur once in a battle. Be careful if your second wind is on cooldown as you may become too exhausted to fight.
Look at wounds
If you’ve been fighting a creature such as a beaver and you want to see how much damage they have taken so far you can use “LOOK BEAVER WOUNDS" and it will list all the wounds your character can see. Not all wounds will show as some may be covered by clothing or armour. However you can often tell if someone has a bleeding wound due to the blood soaking through their clothes.
Trip and Stagger
Some attacks cause the opponent to fall over, Trip attacks roll vs the opponents agility, while stagger will roll vs their strength. If the opponent fails they will be prone. When an opponent is prone it will allow for Downed Attacks, which are typically stronger and harder to defend against than regular attacks.
Party actions
If you’re in a group, these are the combat actions you want to know
Rescue
You can use the ‘RESCUE’ command to save another PC from being targeted and changing the target to you. Helpful if your friend is losing the fight or has taken a critical injury
Guard
Guard prevents an enemy from initiating combat with whomever you target and instead, to initiate it with you
Interpose
This allows you to put yourself between a ranged attacker and your target, causing shots at your target to instead hit you. Useful if you’re wielding a shield to block ranged attacks
Support
The ‘SUPPORT’ command allows you to join combat against the person your target is fighting. This allows you to quickly focus your fire in a group
’Spar’
The ‘SPAR’ command allows you to engage in a fight where any participant can stop the fight at any time. It is used for friendly sparring and training, both participants must accept before a spar can begin
Written by RobotJesus
Combat Stances
Within Futuremud there are a few different combat stances a character can take, these include
Warding - Keeping you opponent at a distance
Normal - Regular melee combat
Clinching - Close range strikes
Wrestling - Clinching range grappling attacks that restrain or wrench limbs
Skirmishing - Moving to a ranged distance within the same room to use a ranged weapon
All of these except for skirmishing can be selected at any time in combat with the commands 'WARD' 'CLINCH' and 'GRAPPLE'
Warding
Warding is influenced by your skill in warding and the length of your weapon, typical weapons that do well with warding would be spears and swords but any weapon (or no weapon) can be used to ward. While warding your opponent will roll to resist your ward, if they succeed they will perform an attack. If they perform an attack however you will perform a warding attack against them which they will have to defend against. The drawback for warding is that you cannot Parry attacks but instead, must either Dodge or use a Shield.
Clinching
Clinching involves getting up close into someone's face to perform attacks. In order to begin a clinch, you must use a round of combat in an attempt to close the distance with them. This will roll for you to initiate the clinch and for your opponent to resist you starting the clinch. If you fail, you will continue to attempt to close the distance until you have succeeded. Once you are within the clinch you will perform Clinching Attacks, Clinching Attacks will always hit your opponent and you will roll your weapon attack vs your opponents dodging ability to determine the damage done. Your opponent may then decide to try and break your clinch by rolling to break, clinch back, begin to wrestle you, or try to trip/stagger you to end the clinch.
Normal
Normal combat allows for block, dodging, and parrying to be used based on the difficulty of the incoming attack and your current skill level. Normal range is the default fighting range
Wrestling
Wrestling occurs at clinch range and is used to prevent the opponent from attacking or moving, you can wrestle to incapacitate or wrestle to kill, wrestling to kill with ‘STRANGLE’ performs choking attacks to the throat after a series of contested rolls against the opponent, while wrestling to incapacitate will set to to a kneeling position and the opponent will be restrained.
Skirmishing
Skirmishing is only selectable via the ‘COMBAT’ command settings. Skirmishing will perform a flee check when you are engaged in melee and bring you to a ranged melee. You will then perform ranged attacks at the opponent. This is particularly useful in group situations as someone who is engaged with an opponent will not be able to pursue you into the skirmish range.
Defend
If you want to forego attacks and fight defensively, you can use the ‘DEFEND’ command, this will give you a bonus to your defensive skills.
Execute
If you wish to perform a Coup de Grace attack, you can use the ‘EXECUTE’ command, ‘EXECUTE LIST’ will show you all of the attacks available to you, if you wish to perform one you must use ‘EXECUTE “Full attack name"
Written by RobotJesus
Combat command and combat config
Using the ‘combat’ command will bring up a helpfile with various different settings for combat. There are a few default combat settings that showcase a few different styles of combat that can be selected with the ‘COMBAT’’ command via ‘COMBAT SET’. Once you find one you like with ‘COMBAT LIST’ you can clone it with ‘COMBAT CLONE’ and modify it with ‘COMBAT CONFIG’. Within the combat config command there are very many ways to tweak your character's AI to perform the behavior you would like, from automatically picking up weapons, to moving straight into warding, and many other selections. This is a very powerful tool and I would recommend experimenting with this to fine tune your combat experience.
If you are wondering why you have stopped attacking a defenseless creature, or any other behavior, it is good to look at the combat settings you have selected to see why. A common reason for someone to stop attacking is the ‘ATTACK HELPLESS’’ setting is set to false, meaning you will not attack anything that is unconscious or about to die.
Attacks Command
Using the Attacks Command you can see what attacks are available to you with your current combat settings for that specific weapon.’ATTACKS’ will show you all of your current unarmed attacks while ‘ATTACKS *weapon*’’ while holding a weapon will tell you every attack it can perform, how hard it is to perform, how hard each of the types of defense is, the orientation of the attack, the stamina cost, the flag associated with the attack, the speed of the attack, and the resist difficulty if it is a tripping or staggering attack. Flags can be used to further fine tune your attacks with combat config so you can restrict attacks available, a common use of this would be for enforcers to require the Non-Lethal tag so they only perform Non-Lethal attacks.
Ranged Combat
When using ranged combat, the difficulty of the shot is determined by size of the target, the light level at the target, the amount of aim you have, any ‘COVER’ the target has and the number of rooms away the target is. Also, in order to fire at someone who is rooms away, you must first spot them with the ‘SCAN’ or ‘QUICKSCAN’ (qs) command. If you don’t want to lose them, or you want to point them out to others in your group you can use the ‘point’ command and others will be able to target them. All available targets you can see can be shown with the ‘targets’ command.
Before firing your weapon however you must first ‘LOAD’ the weapon, ‘READY’ it to be fired, and then ‘AIM’ at your target. When you aim at your target you begin to acquire aim over time. The higher your aim is the more accurate your shot. You will receive an echo when you have reached maximum aim
Players wanting to keep at ranged combat should set their melee settings to ‘Skirmish’ so they will fall back when engaged, otherwise they may try to charge into melee after firing their shot. They may also want to increase or decrease their minimum range before firing so they may attack faster or more accurately.
Written by RobotJesus